출처 : 마이크로소프트 엣지 재설치 2분이면 완료 (tistory.com)


마이크로소프트 엣지 재설치 2분이면 완료

안녕하세요, IT 보기 입니다. '마이크로소프트 엣지'는 윈도우10에서 사용하는 웹 브라우저 입니다. 기존 인터넷 익스플로러보다 가볍고 빠르며, pdf 같은 파일도 보기 편하고 노트북, pc, 태블릿

honeysoju.tistory.com

오류 현상

- 엣지관련 시스템 오류 발생

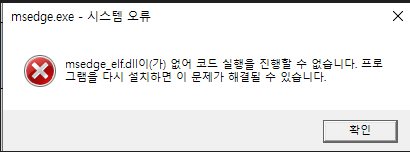
  : "msedge_elf.dll이(가) 없어 코드 실행을 진행할 수 없습니다. 프로~~~" (이미지 참조)

- 최신 버전으로 업그레이드 했으나 동일 증상

- 프로그램 다운로드 후 재설치 했으나 동일 증상


■ 해결 방법

  1. "Windows PowerShell"을 관리자 권한으로 실행


  2. 사용자 폴더로 이동
    PS C:\> cd ~


  3. 재설치 명령어 입력
    Get-AppXPackage -AllUsers -Name Microsoft.MicrosoftEdge | Foreach {Add-AppxPackage -DisableDevelopmentMode -Register "$($_.InstallLocation)\AppXManifest.xml" -Verbose}

  4. 재부팅 후 확인 (재부팅하지 않으면 오류가 해결 되지 않음)


해결 방법#1 : Revit 제품의 완전한 설치제거를 완료하는 방법 (autodesk.co.kr)


Revit 제품의 완전한 설치제거를 완료하는 방법


www.autodesk.co.kr

해결 방법#2 : Revit을 설치하려고 하면 "Autodesk Revit이 이미 설치되어 있습니다" 오류 발생


Revit을 설치하려고 하면 "Autodesk Revit이 이미 설치되어 있습니다" 오류 발생


www.autodesk.co.kr

해결 방법#3 : Revit 2023을 설치할 때 "Revit이 이미 설치되어 있습니다" 오류 발생 (autodesk.co.kr)


Revit 2023을 설치할 때 "Revit이 이미 설치되어 있습니다" 오류 발생


www.autodesk.co.kr


※ 상단 URL을 참고하시기 바랍니다.

(본인은 해결방법#2까지 진행해서 해결 됨)


  1. 해당 폴더를 찾아서 먼저 삭제
    1. C:\Program Files\Autodesk\Revit 2024
    2. C:\ProgramData\Autodesk\RVT 2024
    3. C:\Users\%USERNAME%\AppData\Local\Autodesk\Revit\Autodesk Revit 2024
    4. C:\Users\%USERNAME%\AppData\Roaming\Autodesk\Revit\Autodesk Revit 2024
  2. 레지스트리 삭제
    1. HKEY_CURRENT_USER\Software\Autodesk\Revit\Autodesk Revit 2024
    2. HKEY_LOCAL_MACHINE\SOFTWARE\Autodesk\Revit\Autodesk Revit 2024
  3. 재부팅
  4. AdskUninstallHelper 실행
    C:\ProgramData\Autodesk\Uninstallers\Autodesk Revit 2024에 있는 AdskUninstallHelper 도구를 실행합니다.

  5. 재설치

■ 기준 버전

# cat /etc/redhat-release
CentOS Linux release 7.9.2009 (Core)


■ 호스트 이름(Hostname) 확인 명령

#hostname
(설정된 Hostname 또는 DNS 정보를 참조한 HostName)

#hostnamectl
(OS 정보 및 설정된 HostName 정보)


호스트 이름 변경

#hostname linuxsrv


#hostnamectl set-hostname linuxsrv
#hostnamectl --static set-hostname linuxsrv
(/etc/hostname 이 변경됨)


 호스트 이름 추가 확인

#hostnamectl | grep hostname


※ 자세한 옵션은 다른 글을 참고하세요. 본 글은 본인이 사용하기 위한 메모의 목적입니다.


https://docs.microsoft.com/ko-kr/visualstudio/deployment/walkthrough-downloading-assemblies-on-demand-with-the-clickonce-deployment-api?view=vs-2022 


주문형 어셈블리 다운로드(ClickOnce API) - Visual Studio (Windows)

ClickOnce 애플리케이션의 특정 어셈블리를 선택 사항으로 표시하고 공용 언어 런타임에 필요할 때 다운로드하는 방법을 알아봅니다.

docs.microsoft.com


연습: ClickOnce 배포 API를 통해 주문형 어셈블리 다운로드


기본적으로 ClickOnce 애플리케이션에 포함된 모든 어셈블리는 애플리케이션을 처음 실행할 때 다운로드됩니다. 그러나 소수의 사용자가 사용하는 일부 애플리케이션이 있을 수 있습니다. 이 경우 해당 형식 중 하나를 만들 때에만 어셈블리를 다운로드하고자 할 수 있습니다. 다음 연습에서는 애플리케이션의 특정 어셈블리를 "선택 사항"으로 표시하는 방법 및 CLR(공용 언어 런타임)에서 요청할 때 System.Deployment.Application 네임스페이스에 있는 클래스를 사용하여 이를 다운로드하는 방법을 설명합니다.

 참고

이 절차를 사용하려면 완전 신뢰 상태에서 애플리케이션을 실행해야 합니다.

사전 요구 사항

이 연습을 완료하려면 다음 구성 요소 중 하나가 필요합니다.

  • Windows SDK. Windows SDK는 Microsoft 다운로드 센터에서 다운로드할 수 있습니다.
  • Visual Studio.

프로젝트 만들기

주문형 어셈블리를 사용하는 프로젝트를 만들려면

  1. ClickOnceOnDemand라는 디렉터리를 만듭니다.
  2. Windows SDK 명령 프롬프트 또는 Visual Studio 명령 프롬프트를 엽니다.
  3. ClickOnceOnDemand 디렉터리로 변경합니다.
  4. 다음 명령을 사용하여 퍼블릭/프라이빗 키 쌍을 생성합니다.
    sn -k TestKey.snk
    
  5. cmd복사
  6. 메모장 또는 다른 텍스트 편집기를 사용하여 Message라는 단일 속성을 사용하여 DynamicClass라는 클래스를 정의합니다.
    using System;
    using System.Collections.Generic;
    using System.Text;
    
    namespace Microsoft.Samples.ClickOnceOnDemand
    {
        public class DynamicClass
        {
            public DynamicClass() {}
    
            public string Message
            {
                get
                {
                    return ("Hello, world!");
                }
            }
        }
    }
    
  7. C#복사
  8. 사용하는 언어에 따라 ClickOnceLibrary.cs 또는 ClickOnceLibrary.vb 라는 파일로 텍스트를 ClickOnceOnDemand 디렉터리에 저장합니다.
  9. 파일을 어셈블리로 컴파일합니다.
    csc /target:library /keyfile:TestKey.snk ClickOnceLibrary.cs
    
  10. C#복사
  11. 어셈블리를 위한 퍼블릭 키 토큰을 얻으려면 다음 명령을 사용합니다.
    sn -T ClickOnceLibrary.dll
    
  12. cmd복사
  13. 텍스트 편집기를 사용하여 새 파일을 만들고 다음 코드를 입력합니다. 이 코드는 필요한 경우 ClickOnceLibrary 어셈블리를 다운로드하는 Windows Forms 애플리케이션을 만듭니다.
    using System;
    using System.Collections.Generic;
    using System.ComponentModel;
    using System.Data;
    using System.Drawing;
    using System.Text;
    using System.Windows.Forms;
    using System.Reflection;
    using System.Deployment.Application;
    using Microsoft.Samples.ClickOnceOnDemand;
    
    namespace ClickOnceOnDemand
    {
        [System.Security.Permissions.SecurityPermission(System.Security.Permissions.SecurityAction.Demand, Unrestricted=true)]
        public class Form1 : Form
        {
            // Maintain a dictionary mapping DLL names to download file groups. This is trivial for this sample,
            // but will be important in real-world applications where a feature is spread across multiple DLLs,
            // and you want to download all DLLs for that feature in one shot. 
            Dictionary<String, String> DllMapping = new Dictionary<String, String>();
    
            public static void Main()
            {
                Form1 NewForm = new Form1();
                Application.Run(NewForm);
            }
    
            public Form1()
            {
                // Configure form. 
                this.Size = new Size(500, 200);
                Button getAssemblyButton = new Button();
                getAssemblyButton.Size = new Size(130, getAssemblyButton.Size.Height);
                getAssemblyButton.Text = "Test Assembly";
                getAssemblyButton.Location = new Point(50, 50);
                this.Controls.Add(getAssemblyButton);
                getAssemblyButton.Click += new EventHandler(getAssemblyButton_Click);
    
                DllMapping["ClickOnceLibrary"] = "ClickOnceLibrary";
                AppDomain.CurrentDomain.AssemblyResolve += new ResolveEventHandler(CurrentDomain_AssemblyResolve);
            }
    
            /*
             * Use ClickOnce APIs to download the assembly on demand.
             */
            private Assembly CurrentDomain_AssemblyResolve(object sender, ResolveEventArgs args)
            {
                Assembly newAssembly = null;
    
                if (ApplicationDeployment.IsNetworkDeployed)
                {
                    ApplicationDeployment deploy = ApplicationDeployment.CurrentDeployment;
    
                    // Get the DLL name from the Name argument.
                    string[] nameParts = args.Name.Split(',');
                    string dllName = nameParts[0];
                    string downloadGroupName = DllMapping[dllName];
    
                    try
                    {
                        deploy.DownloadFileGroup(downloadGroupName);
                    }
                    catch (DeploymentException de)
                    {
                        MessageBox.Show("Downloading file group failed. Group name: " + downloadGroupName + "; DLL name: " + args.Name);
                        throw (de);
                    }
    
                    // Load the assembly.
                    // Assembly.Load() doesn't work here, as the previous failure to load the assembly
                    // is cached by the CLR. LoadFrom() is not recommended. Use LoadFile() instead.
                    try
                    {
                        newAssembly = Assembly.LoadFile(Application.StartupPath + @"\" + dllName + ".dll," +  
                "Version=1.0.0.0, Culture=en, PublicKeyToken=03689116d3a4ae33");
                    }
                    catch (Exception e)
                    {
                        throw (e);
                    }
                }
                else
                {
                    //Major error - not running under ClickOnce, but missing assembly. Don't know how to recover.
                    throw (new Exception("Cannot load assemblies dynamically - application is not deployed using ClickOnce."));
                }
    
    
                return (newAssembly);
            }
    
            private void getAssemblyButton_Click(object sender, EventArgs e)
            {
                DynamicClass dc = new DynamicClass();
                MessageBox.Show("Message: " + dc.Message);
            }
        }
    }
    
  14. C#복사
  15. 코드에서 LoadFile에 대한 호출을 찾습니다.
  16. PublicKeyToken을 이전에 검색한 값으로 설정합니다.
  17. 파일을 Form1.cs 또는 Form1.vb 로 저장합니다.
  18. 다음 명령을 사용하여 실행 파일로 컴파일합니다.
    csc /target:exe /reference:ClickOnceLibrary.dll Form1.cs
    
  19. C#복사

어셈블리를 선택 사항으로 표시

MageUI.exe를 사용하여 ClickOnce 애플리케이션에서 어셈블리를 선택 사항으로 표시하려면

  1. MageUI.exe 를 사용하여 연습: ClickOnce 애플리케이션 수동으로 배포에 설명된 대로 애플리케이션 매니페스트를 만듭니다. 애플리케이션 매니페스트에 대해 다음 설정을 사용합니다.
    • 애플리케이션 매니페스트의 이름을 ClickOnceOnDemand 로 지정합니다.
    • 파일 페이지의 ClickOnceLibrary.dll 행에서 파일 형식 열을 없음 으로 설정합니다.
    • 파일 페이지의 ClickOnceLibrary.dll 행에서 Group 열에 ClickOnceLibrary.dll을 입력합니다.
  2. MageUI.exe 를 사용하여 연습: ClickOnce 애플리케이션 수동으로 배포에 설명된 대로 배포 매니페스트를 만듭니다. 배포 매니페스트에 대해 다음 설정을 사용합니다.
    • 배포 매니페스트의 이름을 ClickOnceOnDemand로 지정합니다.

새 어셈블리 테스트

요청 시 어셈블리를 테스트하려면

  1. 웹 서버에 ClickOnce 배포를 업로드합니다.
  2. 배포 매니페스트에 URL을 입력하여 웹 브라우저에서 ClickOnce로 배포된 애플리케이션을 시작합니다. ClickOnceClickOnceOnDemand 애플리케이션을 호출하고 adatum.com 루트 디렉터리에 업로드하면 URL은 다음과 같습니다.
    http://www.adatum.com/ClickOnceOnDemand/ClickOnceOnDemand.application
    
  3. 복사
  4. 기본 폼이 나타나면 Button을 누릅니다. 메시지 상자 창에 "Hello, World!"라는 문자열이 표시되어야 합니다.

참조


권장 콘텐츠

  • ClickOnce 애플리케이션 - Visual Studio (Windows)

    게시 마법사를 사용하여 처음으로 ClickOnce 애플리케이션을 게시하는 방법을 알아봅니다. Project 디자이너의 게시 페이지에서 나중에 변경합니다.

  • ClickOnce 앱 수동 배포 - Visual Studio (Windows)

    명령줄 버전 또는 매니페스트 생성 및 편집 도구의 그래픽 버전 중 하나를 사용 하 여 ClickOnce 배포를 만드는 방법에 대해 알아봅니다.

  • 로컬 & 원격 데이터 액세스(ClickOnce 앱) - Visual Studio (Windows)

    로컬 및 원격으로 데이터를 읽고 쓰기 위해 ClickOnce 제공하는 다양한 옵션에 대해 알아봅니다.

  • ClickOnce 및 응용 프로그램 설정 - Visual Studio (Windows)

    응용 프로그램 설정 파일이 ClickOnce 응용 프로그램에서 작동 하는 방법 및 사용자가 다음 버전으로 업그레이드 하는 경우 설정 ClickOnce 마이그레이션하는 방법에 대해 알아봅니다.

  • ClickOnce 업데이트 전략 선택 - Visual Studio (Windows)

    ClickOnce 애플리케이션에서 자동 업데이트를 지원하는 방법과 사용할 수 있는 업데이트 전략을 알아봅니다.

  • ClickOnce 응용 프로그램에 대 한 코드 액세스 보안 - Visual Studio (Windows)

    ClickOnce 응용 프로그램에 대 한 코드 액세스 보안 및 코드 액세스 보안 권한을 구성 하는 방법에 대해 알아봅니다.

  • ClickOnce 애플리케이션 보안 - Visual Studio (Windows)

    ClickOnce 응용 프로그램에 대 한 코드에 대 한 액세스를 제한할 수 있는 .NET Framework의 코드 액세스 보안 제약 조건에 대 한 영향에 대해 알아봅니다.

  • ApplicationDeployment 클래스 (System.Deployment.Application)

    현재 배포를 프로그래밍 방식으로 업데이트하도록 지원하고 요청 시에 파일을 다운로드하도록 처리합니다.Supports updates of the current deployment programmatically, and handles on-demand downloading of files. 이 클래스는 상속될 수 없습니다.This class cannot be inherited.

ORA-01000: maximum open cursors exceeded
ORA-01000: 최대 열기 커서 수를 초과했습니다

--sys나 system 유저로 접속하여 현재 설정된 커서 개수를 확인 한다.
show parameter open_cursors 

--현재 사용중인 섹션의 커서 (100개 초과) 확인
select a.sid, s.process, s.machine, s.module, s.action, count(*) as cnt             
from V$OPEN_CURSOR a, V$SESSION s
where s.sid = a.sid
group by a.sid, s.process, s.machine, s.module, s.action
having count(*) > 100
order by count(*) desc;

--특정 SID 기준 조회
select * from V$OPEN_CURSOR where sid = 4;

--커서 개수 재설정
alter system set open_cursors = 4000 scope=both;


출처 : https://jack-of-all-trades.tistory.com/398

오라클 에러 정보 (ORA-01000) - maximum open cursors exceeded.pdf
0.11MB

DevExpress.XtraEditors.Repository.RepositoryItemButtonEdit repbeiTemp1 = new DevExpress.XtraEditors.Repository.RepositoryItemButtonEdit();
DevExpress.XtraEditors.Repository.RepositoryItemButtonEdit repbeiTemp2 = new DevExpress.XtraEditors.Repository.RepositoryItemButtonEdit();

gridView.CustomRowCellEdit += (s, e) =>
{
	if (e.Column.FieldName == "col1")
	{
		if (e.CellValue == null)
		{
			e.RepositoryItem = null;
		}
		else
		{
			e.RepositoryItem = repbeiTemp1;
		}
	}
	else if (e.Column.FieldName == "col2")
	{
		if (e.CellValue == null)
		{
			e.RepositoryItem = null;
		}
		else
		{
			e.RepositoryItem = repbeiTemp2;
		}
	}
}


참조

: https://docs.devexpress.com/WindowsForms/DevExpress.XtraGrid.Views.Grid.GridView.CustomRowCellEdit

https://docs.devexpress.com/WindowsForms/DevExpress.XtraGrid.Views.Grid.GridView.CustomRowCellEditForEditing


Version CurrentVersion
{
	get
	{
		if (System.Deployment.Application.ApplicationDeployment.IsNetworkDeployed)
		{
			System.Deployment.Application.ApplicationDeployment ad = System.Deployment.Application.ApplicationDeployment.CurrentDeployment;
			return ad.CurrentVersion;
		}
		else
		{
        	//string fileName = System.Reflection.Assembly.GetExecutingAssembly().Location;
        	//Assembly.LoadFile(fileName).GetName().Version;
			return Assembly.GetExecutingAssembly().GetName().Version;
		}
	}
}

Version UpdateVersion
{
	get
	{
		if (System.Deployment.Application.ApplicationDeployment.IsNetworkDeployed)
		{
			System.Deployment.Application.ApplicationDeployment ad = System.Deployment.Application.ApplicationDeployment.CurrentDeployment;
			return ad.UpdatedVersion;
		}
		return null;
	}
}


using Newtonsoft.Json.Linq;
//======
Json Write
//======
void WriteJson(){
	JObject jProp = new JObject
	{
		{ "id", "user" },
		{ "name", "Pillar Park" },
	};
	jProp.Add("email", "userpark@userpark.net");
	jProp.Add("country", "Korea (South)");

	JObject jRoot = new JObject(new JProperty("Root", jAttr));

	File.WriteAllText("test.json", jRoot.ToString());
}


//======
Json Read
//======
void ReadJson()
{
	string str = null;
	using (StreamReader sr = new System.IO.StreamReader("test.json"))
	{
		str = sr.ReadToEnd();
		sr.Close();
	}
    //str = File.ReadAllText("test.json");
    
    JObject jRoot = JObject.Parse(str);
    JToken jToken = jRoot["Root"];
    if (jToken["id"] != null)
    {
    	Console.WriteLine(jToken["id"].ToString());
    }
}


/**
// KeyDown : 컨트롤에 포커스가 있을 때 키를 누르면 발생합니다.
//   - https://docs.microsoft.com/ko-kr/dotnet/api/system.windows.forms.control.keydown?view=net-5.0
// KeyPress : 컨트롤에 포커스가 있을 때 문자, 스페이스 또는 백스페이스 키를 누르면 발생합니다.
//   - https://docs.microsoft.com/ko-kr/dotnet/api/system.windows.forms.control.keypress?view=net-5.0
// KeyUp : 컨트롤에 포커스가 있을 때 키를 눌렀다 놓으면 발생합니다.
//   - https://docs.microsoft.com/ko-kr/dotnet/api/system.windows.forms.control.keyup?view=net-5.0
 */

//===========================================================

edtSampleControl.KeyDown += OnKeyDown_Enter; //엔터값 확인 
private void OnKeyDown_Enter(object sender, KeyEventArgs e)
{

	Console.WriteLine($"KeyDown code: {e.KeyCode}, value: {e.KeyValue}, modifiers: {e.Modifiers}" + "\r\n");
    
	if (e.KeyCode == Keys.Enter)
	{
		//엔터입력 처리
		e.Handled = true;
	}
}

//===========================================================

edtSampleControl.KeyPress += OnKeyPress_OnlyNumberic; //숫자, 백스페이스, 삭제만 허용
private void OnKeyPress_OnlyNumberic(object sender, KeyPressEventArgs e)
{
	Console.WriteLine($"KeyPress keychar: {e.KeyChar}" + "\r\n");

	//숫자, 백스페이스, 삭제만 허용
	char keyChar = e.KeyChar;
	if (!(char.IsDigit(keyChar) || e.KeyChar == Convert.ToChar(Keys.Back) || e.KeyChar == Convert.ToChar(Keys.Delete)))    //숫자와 백스페이스, 삭제를 제외한 나머지를 바로 처리
	{
		e.Handled = true;
	}
}

//===========================================================

edtSampleControl.KeyPress += OnKeyPress_EscapeToClear; //Escape(ESC) 입력시 Text지우기
private void OnKeyPress_OnlyNumberic(object sender, KeyPressEventArgs e)
{

	Console.WriteLine($"KeyPress keychar: {e.KeyChar}" + "\r\n");
    
	//Escape(ESC) 입력시 Text지우기
	if (e.KeyChar == Convert.ToChar(Keys.Escape))
	{
		Control cmp = sender as Control;
		if(cmp != null)
		{
			cmp.Text = null;
			e.Handled = true;
		}
	}
}

//===========================================================

edtSampleControl.KeyPress += OnKeyUp_Sample;
private void OnKeyUp_Sample(object sender, KeyEventArgs e)
{
	Console.WriteLine( $"KeyUp code: {e.KeyCode}, value: {e.KeyValue}, modifiers: {e.Modifiers}" + "\r\n");
}

무료 .NET용 컴포넌트

===================================================

ComponentFactory/Krypton (오리지널)

https://github.com/ComponentFactory/Krypton


GitHub - ComponentFactory/Krypton: Krypton WinForms components for .NET

Krypton WinForms components for .NET. Contribute to ComponentFactory/Krypton development by creating an account on GitHub.

github.com

NuGet : https://www.nuget.org/packages/KryptonToolkitSuite/4.6.501


KryptonToolkitSuite 4.6.501

Krypton WinForms components for .NET

www.nuget.org


ComponentFactory/Krypton에서 분기된 프로젝트

https://github.com/megakraken/Krypton


GitHub - megakraken/Krypton: Krypton WinForms components for .NET

Krypton WinForms components for .NET. Contribute to megakraken/Krypton development by creating an account on GitHub.

github.com

NuGet : https://www.nuget.org/packages/Krypton.Components.Suite/4.5.9


Krypton.Components.Suite 4.5.9

Krypton Suite of .NET WinForms Controls

www.nuget.org


※ Visual Studio Community 2019에서 사용 가능 확인함.

※ 두가지 중 뭐가 좋은지 확인 되지 않음 그건 사용 자분들이 ^^

출처 : https://practical365.com/export-mailboxes-exchange-server-2010-sp1/


How to Export Mailboxes with Exchange Server 2010 SP1

How to use Mailbox Export Requests in Exchange Server 2010 SP1 to export mailboxes to PST file.

practical365.com


"Windows PowerShell" 또는 "Exchange Management Shell" 실행

  • Export 권한 부여
    New-ManagementRoleAssignment –Role "Mailbox Import Export" –User Administrator

  • Export 실행
    New
    -MailboxExportRequest -Mailbox {사서함계정} -FilePath "{UNC경로\사서함계정.pst}"

  • Export 간략 상태 (Queued : 실행 대기/자료 취합, InProgress : Export중, Completed : 완료)
    Get-MailboxExportRequest

  • Export 상세 상태
    Get
    -MailboxExportRequest -Name MailboxExport | fl

  • Export 완료된 것 목록에서 제거
    Get-MailboxExportRequest | where {$_.status -eq "Completed"} | Remove-MailboxExportRequest

출처 : https://docs.microsoft.com/ko-kr/exchange/new-features/build-numbers-and-release-dates?view=exchserver-2016 


Exchange Server 빌드 번호 및 릴리스 날짜

요약: 현재 및 이전 버전의 Exchange Server에 대한 빌드 번호와 릴리스 날짜에 대해 알아봅니다.

docs.microsoft.com


Get-ExchangeServer | Format-List Name,Edition,AdminDisplayVersion


Exchange Server 2019

이 섹션의 표에서는 각 Microsoft Exchange Server 2019 버전의 빌드 번호와 일반적인 릴리스 날짜를 제공합니다.


EXCHANGE SERVER 2019제품 이름릴리스 날짜빌드 번호(짧은 형식)빌드 번호(긴 형식)

   Exchange Server 2019 CU10 Jul21SU 2021년 7월 13일 15.2.922.13 15.02.0922.013
Exchange Server 2019 CU10 2021년 6월 29일 15.2.922.7 15.02.0922.007
   Exchange Server 2019 CU9 Jul21SU 2021년 7월 13일 15.2.858.15 15.02.0858.015
   Exchange Server 2019 CU9 May21SU 2021년 5월 11일 15.2.858.12 15.02.0858.012
   Exchange Server 2019 CU9 Apr21SU 2021년 4월 13일 15.2.858.10 15.02.0858.010
Exchange Server 2019 CU9 2021년 3월 16일 15.2.858.5 15.02.0858.005
   Exchange Server 2019 CU8 May21SU 2021년 5월 11일 15.2.792.15 15.02.0792.015
   Exchange Server 2019 CU8 Apr21SU 2021년 4월 13일 15.2.792.13 15.02.0792.013
   Exchange Server 2019 CU8 Mar21SU 2021년 3월 2일 15.2.792.10 15.02.0792.010
Exchange Server 2019 CU8 2020년 12월 15일 15.2.792.3 15.02.0792.003
   Exchange Server 2019 CU7 Mar21SU 2021년 3월 2일 15.2.721.13 15.02.0721.013
Exchange Server 2019 CU7 2020년 9월 15일 15.2.721.2 15.02.0721.002
   Exchange Server 2019 CU6 Mar21SU 2021년 3월 2일 15.2.659.12 15.02.0659.012
Exchange Server 2019 CU6 2020년 6월 16일 15.2.659.4 15.02.0659.004
   Exchange Server 2019 CU5 Mar21SU 2021년 3월 2일 15.2.595.8 15.02.0595.008
Exchange Server 2019 CU5 2020년 3월 17일 15.2.595.3 15.02.0595.003
   Exchange Server 2019 CU4 Mar21SU 2021년 3월 2일 15.2.529.13 15.02.0529.013
Exchange Server 2019 CU4 2019년 12월 17일 15.2.529.5 15.02.0529.005
   Exchange Server 2019 CU3 Mar21SU 2021년 3월 2일 15.2.464.15 15.02.0464.015
Exchange Server 2019 CU3 2019년 9월 17일 15.2.464.5 15.02.0464.005
   Exchange Server 2019 CU2 Mar21SU 2021년 3월 2일 15.2.397.11 15.02.0397.011
Exchange Server 2019 CU2 2019년 6월 18일 15.2.397.3 15.02.0397.003
   Exchange Server 2019 CU1 Mar21SU 2021년 3월 2일 15.2.330.11 15.02.0330.011
Exchange Server 2019 CU1 2019년 2월 12일 15.2.330.5 15.02.0330.005
   Exchange Server 2019 RTM Mar21SU 2021년 3월 2일 15.2.221.18 15.02.0221.018
Exchange Server 2019 RTM 2018년 10월 22일 15.2.221.12 15.02.0221.012
Exchange Server 2019 미리 보기 2018년 7월 24일 15.2.196.0 15.02.0196.000
       

Exchange Server 2016

이 섹션의 표에서는 각 Microsoft Exchange Server 2016 버전의 빌드 번호와 일반적인 릴리스 날짜를 제공합니다.


EXCHANGE SERVER 2016제품 이름릴리스 날짜빌드 번호(짧은 형식)빌드 번호(긴 형식)

   Exchange Server 2016 CU21 Jul21SU 2021년 7월 13일 15.1.2308.14 15.01.2308.014
Exchange Server 2016 CU21 2021년 6월 29일 15.1.2308.8 15.01.2308.008
   Exchange Server 2016 CU20 Jul21SU 2021년 7월 13일 15.1.2242.12 15.01.2242.012
   Exchange Server 2016 CU20 May21SU 2021년 5월 11일 15.1.2242.10 15.01.2242.010
   Exchange Server 2016 CU20 Apr21SU 2021년 4월 13일 15.1.2242.8 15.01.2242.008
Exchange Server 2016 CU20 2021년 3월 16일 15.1.2242.4 15.01.2242.004
   Exchange Server 2016 CU19 May21SU 2021년 5월 11일 15.1.2176.14 15.01.2176.014
   Exchange Server 2016 CU19 Apr21SU 2021년 4월 13일 15.1.2176.12 15.01.2176.012
   Exchange Server 2016 CU19 Mar21SU 2021년 3월 2일 15.1.2176.9 15.01.2176.009
Exchange Server 2016 CU19 2020년 12월 15일 15.1.2176.2 15.01.2176.002
   Exchange Server 2016 CU18 Mar21SU 2021년 3월 2일 15.1.2106.13 15.01.2106.013
Exchange Server 2016 CU18 2020년 9월 15일 15.1.2106.2 15.01.2106.002
   Exchange Server 2016 CU17 Mar21SU 2021년 3월 2일 15.1.2044.13 15.01.2044.013
Exchange Server 2016 CU17 2020년 6월 16일 15.1.2044.4 15.01.2044.004
   Exchange Server 2016 CU16 Mar21SU 2021년 3월 2일 15.1.1979.8 15.01.1979.008
Exchange Server 2016 CU16 2020년 3월 17일 15.1.1979.3 15.01.1979.003
   Exchange Server 2016 CU15 Mar21SU 2021년 3월 2일 15.1.1913.12 15.01.1913.012
Exchange Server 2016 CU15 2019년 12월 17일 15.1.1913.5 15.01.1913.005
   Exchange Server 2016 CU14 Mar21SU 2021년 3월 2일 15.1.1847.12 15.01.1847.012
Exchange Server 2016 CU14 2019년 9월 17일 15.1.1847.3 15.01.1847.003
   Exchange Server 2016 CU13 Mar21SU 2021년 3월 2일 15.1.1779.8 15.01.1779.008
Exchange Server 2016 CU13 2019년 6월 18일 15.1.1779.2 15.01.1779.002
   Exchange Server 2016 CU12 Mar21SU 2021년 3월 2일 15.1.1713.10 15.01.1713.010
Exchange Server 2016 CU12 2019년 2월 12일 15.1.1713.5 15.01.1713.005
   Exchange Server 2016 CU11 Mar21SU 2021년 3월 2일 15.1.1591.18 15.01.1591.018
Exchange Server 2016 CU11 2018년 10월 16일 15.1.1591.10 15.01.1591.010
   Exchange Server 2016 CU10 Mar21SU 2021년 3월 2일 15.1.1531.12 15.01.1531.012
Exchange Server 2016 CU10 2018년 6월 19일 15.1.1531.3 15.01.1531.003
   Exchange Server 2016 CU9 Mar21SU 2021년 3월 2일 15.1.1466.16 15.01.1466.016
Exchange Server 2016 CU9 2018년 3월 20일 15.1.1466.3 15.01.1466.003
   Exchange Server 2016 CU8 Mar21SU 2021년 3월 2일 15.1.1415.10 15.01.1415.010
Exchange Server 2016 CU8 2017년 12월 19일 15.1.1415.2 15.01.1415.002
Exchange Server 2016 CU7 2017년 9월 19일 15.1.1261.35 15.01.1261.035
Exchange Server 2016 CU6 2017년 6월 27일 15.1.1034.26 15.01.1034.026
Exchange Server 2016 CU5 2017년 3월 21일 15.1.845.34 15.01.0845.034
Exchange Server 2016 CU4 2016년 12월 13일 15.1.669.32 15.01.0669.032
Exchange Server 2016 CU3 2016년 9월 20일 15.1.544.27 15.01.0544.027
Exchange Server 2016 CU2 2016년 6월 21일 15.1.466.34 15.01.0466.034
Exchange Server 2016 CU1 2016년 3월 15일 15.1.396.30 15.01.0396.030
Exchange Server 2016 RTM 2015년 10월 1일 15.1.225.42 15.01.0225.042
Exchange Server 2016 미리 보기 2015년 7월 22일 15.1.225.16 15.01.0225.016
       

Exchange Server 2013

이 섹션의 표에서는 각 Microsoft Exchange Server 2013 버전의 빌드 번호와 일반적인 릴리스 날짜가 제공됩니다.


EXCHANGE SERVER 2013제품 이름릴리스 날짜빌드 번호(짧은 형식)빌드 번호(긴 형식)

   Exchange Server 2013 CU23 Jul21SU 2021년 7월 13일 15.0.1497.23 15.00.1497.023
   Exchange Server 2013 CU23 May21SU 2021년 5월 11일 15.0.1497.18 15.00.1497.018
   Exchange Server 2013 CU23 Apr21SU 2021년 4월 13일 15.0.1497.15 15.00.1497.015
   Exchange Server 2013 CU23 Mar21SU 2021년 3월 2일 15.0.1497.12 15.00.1497.012
Exchange Server 2013 CU23 2019년 6월 18일 15.0.1497.2 15.00.1497.002
   Exchange Server 2013 CU22 Mar21SU 2021년 3월 2일 15.0.1473.6 15.00.1473.006
Exchange Server 2013 CU22 2019년 2월 12일 15.0.1473.3 15.00.1473.003
   Exchange Server 2013 CU21 Mar21SU 2021년 3월 2일 15.0.1395.12 15.00.1395.012
Exchange Server 2013 CU21 2018년 6월 19일 15.0.1395.4 15.00.1395.004
Exchange Server 2013 CU20 2018년 3월 20일 15.0.1367.3 15.00.1367.003
Exchange Server 2013 CU19 2017년 12월 19일 15.0.1365.1 15.00.1365.001
Exchange Server 2013 CU18 2017년 9월 19일 15.0.1347.2 15.00.1347.002
Exchange Server 2013 CU17 2017년 6월 27일 15.0.1320.4 15.00.1320.004
Exchange Server 2013 CU16 2017년 3월 21일 15.0.1293.2 15.00.1293.002
Exchange Server 2013 CU15 2016년 12월 13일 15.0.1263.5 15.00.1263.005
Exchange Server 2013 CU14 2016년 9월 20일 15.0.1236.3 15.00.1236.003
Exchange Server 2013 CU13 2016년 6월 21일 15.0.1210.3 15.00.1210.003
Exchange Server 2013 CU12 2016년 3월 15일 15.0.1178.4 15.00.1178.004
Exchange Server 2013 CU11 2015년 12월 15일 15.0.1156.6 15.00.1156.006
Exchange Server 2013 CU10 2015년 9월 15일 15.0.1130.7 15.00.1130.007
Exchange Server 2013 CU9 2015년 6월 17일 15.0.1104.5 15.00.1104.005
Exchange Server 2013 CU8 2015년 3월 17일 15.0.1076.9 15.00.1076.009
Exchange Server 2013 CU7 2014년 12월 9일 15.0.1044.25 15.00.1044.025
Exchange Server 2013 CU6 2014년 8월 26일 15.0.995.29 15.00.0995.029
Exchange Server 2013 CU5 2014년 5월 27일 15.0.913.22 15.00.0913.022
   Exchange Server 2013 SP1 Mar21SU 2021년 3월 2일 15.0.847.64 15.00.0847.064
Exchange Server 2013 SP1 2014년 2월 25일 15.0.847.32 15.00.0847.032
Exchange Server 2013 CU3 2013년 11월 25일 15.0.775.38 15.00.0775.038
Exchange Server 2013 CU2 2013년 7월 9일 15.0.712.24 15.00.0712.024
Exchange Server 2013 CU1 2013년 4월 2일 15.0.620.29 15.00.0620.029
Exchange Server 2013 RTM 2012년 12월 3일 15.0.516.32 15.00.0516.032
       

Exchange Server 2010

이 섹션의 표에서는 각 Microsoft Exchange Server 2010 버전의 빌드 번호와 일반적인 릴리스 날짜가 제공됩니다.

Exchange Server 2010 SP3 빌드 번호


EXCHANGE SERVER 2010 SP3 빌드 번호제품 이름릴리스 날짜빌드 번호(짧은 형식)빌드 번호(긴 형식)

Exchange Server 2010 SP3용 업데이트 롤업 32 2021년 3월 2일 14.3.513.0 14.03.0513.000
Exchange Server 2010 SP3용 업데이트 롤업 31 2020년 12월 1일 14.3.509.0 14.03.0509.000
Exchange Server 2010 SP3용 업데이트 롤업 30 2020년 2월 11일 14.3.496.0 14.03.0496.000
Exchange Server 2010 SP3용 업데이트 롤업 29 2019년 7월 9일 14.3.468.0 14.03.0468.000
Exchange Server 2010 SP3용 업데이트 롤업 28 2019년 6월 7일 14.3.461.1 14.03.0461.001
Exchange Server 2010 SP3용 업데이트 롤업 27 2019년 4월 9일 14.3.452.0 14.03.0452.000
Exchange Server 2010 SP3용 업데이트 롤업 26 2019년 2월 12일 14.3.442.0 14.03.0442.000
Exchange Server 2010 SP3용 업데이트 롤업 25 2019년 1월 8일 14.3.435.0 14.03.0435.000
Exchange Server 2010 SP3용 업데이트 롤업 24 2018년 9월 5일 14.3.419.0 14.03.0419.000
Exchange Server 2010 SP3용 업데이트 롤업 23 2018년 8월 13일 14.3.417.1 14.03.0417.001
Exchange Server 2010 SP3용 업데이트 롤업 22 2018년 6월 19일 14.3.411.0 14.03.0411.000
Exchange Server 2010 SP3용 업데이트 롤업 21 2018년 5월 7일 14.3.399.2 14.03.0399.002
Exchange Server 2010 SP3용 업데이트 롤업 20 2018년 3월 5일 14.3.389.1 14.03.0389.001
Exchange Server 2010 SP3용 업데이트 롤업 19 2017년 12월 19일 14.3.382.0 14.03.0382.000
Exchange Server 2010 SP3용 업데이트 롤업 18 2017년 7월 11일 14.3.361.1 14.03.0361.001
Exchange Server 2010 SP3용 업데이트 롤업 17 2017년 3월 21일 14.3.352.0 14.03.0352.000
Exchange Server 2010 SP3용 업데이트 롤업 16 2016년 12월 13일 14.3.336.0 14.03.0336.000
Exchange Server 2010 SP3용 업데이트 롤업 15 2016년 9월 20일 14.3.319.2 14.03.0319.002
Exchange Server 2010 SP3용 업데이트 롤업 14 2016년 6월 21일 14.3.301.0 14.03.0301.000
Exchange Server 2010 SP3용 업데이트 롤업 13 2016년 3월 15일 14.3.294.0 14.03.0294.000
Exchange Server 2010 SP3용 업데이트 롤업 12 2015년 12월 15일 14.3.279.2 14.03.0279.002
Exchange Server 2010 SP3용 업데이트 롤업 11 2015년 9월 15일 14.3.266.2 14.03.0266.002
Exchange Server 2010 SP3용 업데이트 롤업 10 2015년 6월 17일 14.3.248.2 14.03.0248.002
Exchange Server 2010 SP3용 업데이트 롤업 9 2015년 3월 17일 14.3.235.1 14.03.0235.001
Exchange Server 2010 SP3용 업데이트 롤업 8 v2 2014년 12월 12일 14.3.224.2 14.03.0224.002
Exchange Server 2010 SP3용 업데이트 롤업 8 v1(회수됨) 2014년 12월 9일 14.3.224.1 14.03.0224.001
Exchange Server 2010 SP3용 업데이트 롤업 7 2014년 8월 26일 14.3.210.2 14.03.0210.002
Exchange Server 2010 SP3용 업데이트 롤업 6 2014년 5월 27일 14.3.195.1 14.03.0195.001
Exchange Server 2010 SP3용 업데이트 롤업 5 2014년 2월 24일 14.3.181.6 14.03.0181.006
Exchange Server 2010 SP3용 업데이트 롤업 4 2013년 12월 9일 14.3.174.1 14.03.0174.001
Exchange Server 2010 SP3용 업데이트 롤업 3 2013년 11월 25일 14.3.169.1 14.03.0169.001
Exchange Server 2010 SP3용 업데이트 롤업 2 2013년 8월 8일 14.3.158.1 14.03.0158.001
Exchange Server 2010 SP3용 업데이트 롤업 1 2013년 5월 29일 14.3.146.0 14.03.0146.000
Exchange Server 2010 SP3 2013년 2월 12일 14.3.123.4 14.03.0123.004
       

Exchange Server 2010 이전 릴리스의 빌드 번호


EXCHANGE SERVER 2010 이전 릴리스의 빌드 번호제품 이름릴리스 날짜빌드 번호(짧은 형식)빌드 번호(긴 형식)

Exchange Server 2010 SP2용 업데이트 롤업 8 2013년 12월 9일 14.2.390.3 14.02.0390.003
Exchange Server 2010 SP2용 업데이트 롤업 7 2013년 8월 3일 14.2.375.0 14.02.0375.000
Exchange Server 2010 SP2용 업데이트 롤업 6 2013년 2월 12일 14.2.342.3 14.02.0342.003
Exchange Server 2010 SP2용 업데이트 롤업 5 v2 2012년 12월 10일 14.2.328.10 14.02.0328.010
Exchange Server 2010 SP2용 업데이트 롤업 5 2012년 11월 13일 14.3.328.5 14.03.0328.005
Exchange Server 2010 SP2용 업데이트 롤업 4 v2 2012년 10월 9일 14.2.318.4 14.02.0318.004
Exchange Server 2010 SP2용 업데이트 롤업 4 2012년 8월 13일 14.2.318.2 14.02.0318.002
Exchange Server 2010 SP2용 업데이트 롤업 3 2012년 5월 29일 14.2.309.2 14.02.0309.002
Exchange Server 2010 SP2용 업데이트 롤업 2 2012년 4월 16일 14.2.298.4 14.02.0298.004
Exchange Server 2010 SP2용 업데이트 롤업 1 2012년 2월 13일 14.2.283.3 14.02.0283.003
Exchange Server 2010 SP2 2011년 12월 4일 14.2.247.5 14.02.0247.005
       
Exchange Server 2010 SP1용 업데이트 롤업 8 2012년 12월 10일 14.1.438.0 14.01.0438.000
Exchange Server 2010 SP1용 업데이트 롤업 7 v3 2012년 11월 13일 14.1.421.3 14.01.0421.003
Exchange Server 2010 SP1용 업데이트 롤업 7 v2 2012년 10월 10일 14.1.421.2 14.01.0421.002
Exchange Server 2010 SP1용 업데이트 롤업 7 2012년 8월 8일 14.1.421.0 14.01.0421.000
Exchange Server 2010 SP1용 업데이트 롤업 6 2011년 10월 27일 14.1.355.2 14.01.0355.002
Exchange Server 2010 SP1용 업데이트 롤업 5 2011년 8월 23일 14.1.339.1 14.01.0339.001
Exchange Server 2010 SP1용 업데이트 롤업 4 2011년 7월 27일 14.1.323.6 14.01.0323.006
Exchange Server 2010 SP1용 업데이트 롤업 3 2011년 4월 6일 14.1.289.7 14.01.0289.007
Exchange Server 2010 SP1용 업데이트 롤업 2 2010년 12월 9일 14.1.270.1 14.01.0270.001
Exchange Server 2010 SP1용 업데이트 롤업 1 2010년 10월 4일 14.1.255.2 14.01.0255.002
Exchange Server 2010 SP1 2010년 8월 23일 14.1.218.15 14.01.0218.015
       
Exchange Server 2010용 업데이트 롤업 5 2010년 12월 13일 14.0.726.0 14.00.0726.000
Exchange Server 2010용 업데이트 롤업 4 2010년 6월 10일 14.0.702.1 14.00.0702.001
Exchange Server 2010용 업데이트 롤업 3 2010년 4월 13일 14.0.694.0 14.00.0694.000
Exchange Server 2010용 업데이트 롤업 2 2010년 3월 4일 14.0.689.0 14.00.0689.000
Exchange Server 2010용 업데이트 롤업 1 2009년 12월 9일 14.0.682.1 14.00.0682.001
Exchange Server 2010 RTM 2009년 11월 9일 14.0.639.21 14.00.0639.021
       

Exchange Server 2007

이 섹션의 표에서는 각 Microsoft Exchange Server 2007 버전의 빌드 번호와 일반적인 릴리스 날짜가 제공됩니다.

 참고

Exchange Server 2007 SP1에 대한 버전 정보는 Exchange 관리 콘솔, Exchange 관리 셸 및 Exchange Server 2007 도움말 대화 상자에 명확하게 표시되어 있습니다. 그러나 Exchange 2007 RTM 버전을 실행 중인 Edge 전송 서버에 Exchange 2007 SP1을 적용한 후 Edge 전송 서버를 Active Directory 사이트에 다시 구독하지 않으면 Exchange Management Console에 Edge 전송 서버의 버전 정보가 업데이트되지 않습니다. 이는 Edge 전송 서버는 구성 정보를 사용하여 Active Directory를 직접 업데이트하지 않기 때문입니다. 대신 Edge 구독을 만드는 동안 Edge 전송 서버의 버전 정보가 Active Directory에 기록됩니다.


EXCHANGE SERVER 2007제품 이름릴리스 날짜빌드 번호(짧은 형식)빌드 번호(긴 형식)

Exchange Server 2007 SP3용 업데이트 롤업 23 2017년 3월 21일 8.3.517.0 8.03.0517.000
Exchange Server 2007 SP3용 업데이트 롤업 22 2016년 12월 13일 8.3.502.0 8.03.0502.000
Exchange Server 2007 SP3용 업데이트 롤업 21 2016년 9월 20일 8.3.485.1 8.03.0485.001
Exchange Server 2007 SP3용 업데이트 롤업 20 2016년 6월 21일 8.3.468.0 8.03.0468.000
Exchange Server 2007 SP3용 업데이트 롤업 19 2016년 3월 15일 8.3.459.0 8.03.0459.000
Exchange Server 2007 SP3용 업데이트 롤업 18 2015년 12월 8.3.445.0 8.03.0445.000
Exchange Server 2007 SP3용 업데이트 롤업 17 2015년 6월 17일 8.3.417.1 8.03.0417.001
Exchange Server 2007 SP3용 업데이트 롤업 16 2015년 3월 17일 8.3.406.0 8.03.0406.000
Exchange Server 2007 SP3용 업데이트 롤업 15 2014년 12월 9일 8.3.389.2 8.03.0389.002
Exchange Server 2007 SP3용 업데이트 롤업 14 2014년 8월 26일 8.3.379.2 8.03.0379.002
Exchange Server 2007 SP3용 업데이트 롤업 13 2014년 2월 24일 8.3.348.2 8.03.0348.002
Exchange Server 2007 SP3용 업데이트 롤업 12 2013년 12월 9일 8.3.342.4 8.03.0342.004
Exchange Server 2007 SP3용 업데이트 롤업 11 2013년 8월 13일 8.3.327.1 8.03.0327.001
Exchange Server 2007 SP3용 업데이트 롤업 10 2013년 2월 11일 8.3.298.3 8.03.0298.003
Exchange Server 2007 SP3용 업데이트 롤업 9 2012년 12월 10일 8.3.297.2 8.03.0297.002
Exchange Server 2007 SP3용 업데이트 롤업 8-v3 2012년 11월 13일 8.3.279.6 8.03.0279.006
Exchange Server 2007 SP3용 업데이트 롤업 8-v2 2012년 10월 9일 8.3.279.5 8.03.0279.005
Exchange Server 2007 SP3용 업데이트 롤업 8 2012년 8월 13일 8.3.279.3 8.03.0279.003
Exchange Server 2007 SP3용 업데이트 롤업 7 2012년 4월 16일 8.3.264.0 8.03.0264.000
Exchange Server 2007 SP3용 업데이트 롤업 6 2012년 1월 26일 8.3.245.2 8.03.0245.002
Exchange Server 2007 SP3용 업데이트 롤업 5 2011년 9월 21일 8.3.213.1 8.03.0213.001
Exchange Server 2007 SP3용 업데이트 롤업 4 2011년 5월 28일 8.3.192.1 8.03.0192.001
Exchange Server 2007 SP3용 업데이트 롤업 3-v2 2011년 3월 30일 8.3.159.2 8.03.0159.002
Exchange Server 2007 SP3용 업데이트 롤업 2 2010년 12월 10일 8.3.137.3 8.03.0137.003
Exchange Server 2007 SP3용 업데이트 롤업 1 2010년 9월 9일 8.3.106.2 8.03.0106.002
Exchange Server 2007 SP3 2010년 6월 7일 8.3.83.6 8.03.0083.006
       

Exchange Server 2007 이전 릴리스의 빌드 번호


EXCHANGE SERVER 2007 이전 릴리스의 빌드 번호제품 이름릴리스 날짜빌드 번호(짧은 형식)빌드 번호(긴 형식)

Exchange Server 2007 SP2용 업데이트 롤업 5 2010년 12월 7일 8.2.305.3 8.02.0305.003
Exchange Server 2007 SP2용 업데이트 롤업 4 2010년 4월 9일 8.2.254.0 8.02.0254.000
Exchange Server 2007 SP2용 업데이트 롤업 3 2010년 3월 17일 8.2.247.2 8.02.0247.002
Exchange Server 2007 SP2용 업데이트 롤업 2 2010년 1월 22일 8.2.234.1 8.02.0234.001
Exchange Server 2007 SP2용 업데이트 롤업 1 2009년 11월 19일 8.2.217.3 8.02.0217.003
Exchange Server 2007 SP2 2009년 8월 24일 8.2.176.2 8.02.0176.002
       
Exchange Server 2007 SP1용 업데이트 롤업 10 2010년 4월 13일 8.1.436.0 8.01.0436.000
Exchange Server 2007 SP1용 업데이트 롤업 9 2009년 7월 16일 8.1.393.1 8.01.0393.001
Exchange Server 2007 SP1용 업데이트 롤업 8 2009년 5월 19일 8.1.375.2 8.01.0375.002
Exchange Server 2007 SP1용 업데이트 롤업 7 2009년 3월 18일 8.1.359.2 8.01.0359.002
Exchange Server 2007 SP1용 업데이트 롤업 6 2009년 2월 10일 8.1.340.1 8.01.0340.001
Exchange Server 2007 SP1용 업데이트 롤업 5 2008년 11월 20일 8.1.336.1 8.01.0336.01
Exchange Server 2007 SP1용 업데이트 롤업 4 2008년 10월 7일 8.1.311.3 8.01.0311.003
Exchange Server 2007 SP1용 업데이트 롤업 3 2008년 7월 8일 8.1.291.2 8.01.0291.002
Exchange Server 2007 SP1용 업데이트 롤업 2 2008년 5월 9일 8.1.278.2 8.01.0278.002
Exchange Server 2007 SP1용 업데이트 롤업 1 2008년 2월 28일 8.1.263.1 8.01.0263.001
Exchange Server 2007 SP1 2007년 11월 29일 8.1.240.6 8.01.0240.006
       
Exchange Server 2007용 업데이트 롤업 7 2008년 7월 8일 8.0.813.0 8.00.0813.000
Exchange Server 2007용 업데이트 롤업 6 2008년 2월 21일 8.0.783.2 8.00.0783.002
Exchange Server 2007용 업데이트 롤업 5 2007년 10월 25일 8.0.754.0 8.00.0754.000
Exchange Server 2007용 업데이트 롤업 4 2007년 8월 23일 8.0.744.0 8.00.0744.000
Exchange Server 2007용 업데이트 롤업 3 2007년 6월 28일 8.0.730.1 8.00.0730.001
Exchange Server 2007용 업데이트 롤업 2 2007년 5월 8일 8.0.711.2 8.00.0711.002
Exchange Server 2007용 업데이트 롤업 1 2007년 4월 17일 8.0.708.3 8.00.0708.003
Exchange Server 2007 RTM 2007년 3월 8일 8.0.685.25 8.00.0685.025
       

Exchange Server 2003

다음 표에는 각 Microsoft Exchange Server 2003 버전의 빌드 번호와 일반적인 릴리스 날짜가 나열되어 있습니다. Exchange Server 2003의 빌드 번호를 보려면 서버 개체의 속성 대화 상자를 엽니다.


EXCHANGE SERVER 2003제품 이름릴리스 날짜빌드 번호

Exchange Server 2003 SP2 이후 2008년 8월 6.5.7654.4
Exchange Server 2003 SP2 이후 2008년 3월 6.5.7653.33
Exchange Server 2003 SP2 2005년 10월 19일 6.5.7683
Exchange Server 2003 SP1 2004년 5월 25일 6.5.7226
Exchange Server 2003 2003년 9월 28일 6.5.6944
     

Exchange 2000 Server

다음 표에는 각 Microsoft Exchange 2000 Server 버전의 빌드 번호와 일반적인 릴리스 날짜가 나열되어 있습니다. Exchange 2000 Server의 빌드 번호를 보려면 서버 개체의 속성 대화 상자를 엽니다.


EXCHANGE 2000 SERVER제품 이름릴리스 날짜빌드 번호

Exchange 2000 Server SP3 이후 2008년 8월 6.0.6620.7
Exchange 2000 Server SP3 이후 2008년 3월 6.0.6620.5
Exchange 2000 Server SP3 이후 2004년 8월 6.0.6603
Exchange 2000 Server SP3 이후 2004년 4월 6.0.6556
Exchange 2000 Server SP3 이후 2003년 9월 6.0.6487
Exchange 2000 Server SP3 2002년 7월 18일 6.0.6249
Exchange 2000 Server SP2 2001년 11월 29일 6.0.5762
Exchange 2000 Server SP1 2001년 6월 21일 6.0.4712
Exchange 2000 Server 2000년 11월 29일 6.0.4417
     

Exchange Server 5.5

다음 표에는 각 Microsoft Exchange Server버전 5.5의 빌드 번호와 일반적인 릴리스 날짜가 나열되어 있습니다.


EXCHANGE SERVER 5.5제품 이름릴리스 날짜빌드 번호

Exchange Server 버전 5.5 SP4 2000년 11월 1일 5.5.2653
Exchange Server 버전 5.5 SP3 1999년 9월 9일 5.5.2650
Exchange Server 버전 5.5 SP2 1998년 12월 23일 5.5.2448
Exchange Server 버전 5.5 SP1 1998년 8월 5일 5.5.2232
Exchange Server 버전 5.5 1998년 2월 3일 5.5.1960
     

Exchange Server 5.0


EXCHANGE SERVER 5.0제품 이름릴리스 날짜빌드 번호

Exchange Server 5.0 SP2 1998년 2월 19일 5.0.1460
Exchange Server 5.0 SP1 1997년 6월 18일 5.0.1458
Exchange Server 5.0 1997년 5월 23일 5.0.1457
     

Exchange Server 4.0

다음 표에는 각 Microsoft Exchange Server 4.0 버전의 빌드 번호와 일반적인 릴리스 날짜가 나열되어 있습니다.


EXCHANGE SERVER 4.0제품 이름릴리스 날짜빌드 번호

Exchange Server 4.0 SP5 1998년 5월 5일 4.0.996
Exchange Server 4.0 SP4 1997년 3월 28일 4.0.995
Exchange Server 4.0 SP3 1996년 10월 29일 4.0.994
Exchange Server 4.0 SP2 1996년 7월 19일 4.0.993
Exchange Server 4.0 SP1 1996년 5월 1일 4.0.838
Exchange Server 4.0 Standard Edition 1996년 6월 11일 4.0.837
     

본글은 PHPSCHOOL 오랜만에 들어갔다가 Tip&Tech에 유용해 보이는 정보가 있어 일단 스크랩 목적으로 글을 가져와 봅니다.

자세한 글이나, 댓글들을 보실려면 출처로 들어가 확인해보시길 추천합니다.


출처 : 구글드라이브를 이용한 OCR 기능(PHP) (https://phpschool.com/link/tipntech/82695)

=====================================


<?php 
// 제가 사용하는 서버의 PHP가 구닥다리 5.2라서 
// https://github.com/alchemy-fr/google-plus-api-client 여기에서 가져왔음
include "libraries/google_api/Google_Client.php";
include "libraries/google_api/contrib/Google_DriveService.php";
 
$client = new Google_Client();
$client->setClientId('XXXXXXXXXX.apps.googleusercontent.com');
$client->setClientSecret('XXXXXXXXXXXX');
$client->setRedirectUri('https://XXXXXXXXX/google_drive/google_drive.php');
     
$scope = array(
    'https://www.googleapis.com/auth/drive',
    'https://www.googleapis.com/auth/drive.readonly.metadata',
    'https://www.googleapis.com/auth/drive.file',
    'https://www.googleapis.com/auth/drive.appdata',
    'https://www.googleapis.com/auth/drive.scripts',
    'https://www.googleapis.com/auth/drive.metadata',
    'https://www.googleapis.com/auth/spreadsheets',
);
 
$client->setScopes($scope);
$client->setAccessType('offline');
 
// auth 토큰 유지 로직 시작 - 토큰 가져오기 방법은 각자 알아서 하세요~
// (https://github.com/googleapis/google-api-php-client 예제가 있음)
$hostname = "XXXXX";
$username = "XXXX";
$userpass = "XXXXXXX";
$dbname = "XXXXX";
$connect = mysqli_connect($hostname, $username, $userpass, $dbname);
 
/**
CREATE TABLE token2 (
  seq INT(11) NOT NULL AUTO_INCREMENT,
  type VARCHAR(255) DEFAULT NULL,
  token TEXT DEFAULT NULL,
  PRIMARY KEY (seq)
)
*/
 
$tokenquery="SELECT * FROM token2 WHERE type='original'";
$tokenresult = mysqli_query($connect,$tokenquery);
$tokenrow=mysqli_fetch_assoc($tokenresult);
 
if($tokenrow) {
  extract($tokenrow);
}
$time_created = json_decode($token)->created;
$t=time();
$timediff=$t-$time_created;
$refreshToken = json_decode($token)->refresh_token;
 
if(($timediff>360)&&($token!=''))
{
  $refreshquery="SELECT * FROM token2 WHERE type='refresh'";
  $refreshresult = mysqli_query($connect,$refreshquery);
  $refreshrow=mysqli_fetch_assoc($refreshresult);
   
  if($refreshrow)
  {
    extract($refreshrow);
    $refresh_created = json_decode($token)->created;
    $refreshtimediff=$t-$refresh_created;
    if($refreshtimediff>3600)
    {
      $client->refreshToken($refreshToken);
      $newtoken=$client->getAccessToken();
      $tokenupdate="UPDATE token2 SET token='$newtoken' WHERE type='refresh'";
      mysqli_query($connect,$tokenupdate);
      $token=$newtoken;
    }
    else
    {
      $client->setAccessToken($token);
    }
  }
  else
  {
    $client->refreshToken($refreshToken);
    $newtoken=$client->getAccessToken();
    $tokenupdate="INSERT INTO token2 (type,token) VALUES ('refresh','$newtoken')";
    mysqli_query($connect,$tokenupdate);
    $token=$newtoken;
  }
}
 
//if token is still good.
if(($timediff<3600)&&($token!=''))
{
  $client->setAccessToken($token); 
}
 
mysqli_close($connect);
// 여기까지 auth 토큰 유지 로직
 
$drive = new Google_DriveService($client);
// 업로드할 파일명
$filename = './PICK.pdf_page_1.jpg';
 
// 업로드할 파일의 상세정보
$title = 'test'; // 파일명
$filedata = file_get_contents($filename);
$size = getimagesize($filename);
$mimeType = $size['mime'];
$imgfile = new Google_DriveFile();
$imgfile->setTitle($title);
$imgfile->setMimeType($mimeType);
 
// 드라이브에 올림
$createdFile = $drive->files->insert($imgfile, array(
    'ocr' => true,
    'ocrLanguage' => 'kr',
    'data' => $filedata,
    'mimeType' => $mimeType,
));
 
$req = new Google_HttpRequest($createdFile->exportLinks['text/plain']);
$val = $client->getIo()->authenticatedRequest($req);
$response = $val->getResponseBody(); 
// Temporary Redirect The document has moved here. 페이지이므로 href만 가져온다
preg_match('/href=(["\'])([^\1]*)\1/i', $response, $m);
 
$req = new Google_HttpRequest($m[2]);
$val = $client->getIo()->authenticatedRequest($req);
// html태그랑 스타일 모두 제거
$response = strip_tags(preg_replace('~\<style(.*)\>(.*)\<\/style\>~', '', $val->getResponseBody()),'<p>');
 
// 처리가 완료된 파일은 삭제. 삭제 안하면 계속 누적되어 보기에 안 좋음
$drive->files->delete($createdFile->id);
 
echo nl2br($response);
?>

※ PHPSCHOOL 및 작성글에 CC정보가 없어 복사는 해왔으나 문제가 될 경우 삭제하겠습니다.

웹을 가끔 하다보면, 새로고침해도 제대로 반영되지 않는 경우 "Ctrl + F5"로 갱신하거나,

아래 코딩맛집님의 글을 보시고 해당 페이지에 코딩해주시면 됩니다.

가끔 웹 유지관리하다가 필요하여 글을 복사하여 둡니다.


PHP

<?php
//error_reporting(E_ALL ^ E_NOTICE);
// W3C P3P 규약설정
@header ("P3P : CP=\"ALL CURa ADMa DEVa TAIa OUR BUS IND PHY ONL UNI PUR FIN COM NAV INT DEM CNT STA POL HEA PRE LOC OTC\"");
//@header("Expires: 0");
@header("Expires: Mon, 26 Jul 1997 05:00:00 GMT");
@header("Last-Modified: " . gmdate("D, d M Y H:i:s") . " GMT");
@header("Cache-Control: no-store, no-cache, must-revalidate");
@header("Cache-Control: post-check=0, pre-check=0", false);
@header("Pragma: no-cache");

//Session 설정
//@session_cache_limiter('no-cache, must-revalidate');
//@session_start();
?>


출처: https://coding-restaurant.tistory.com/339 [코딩맛집]=====================================

로그아웃 후 뒤로가기 클릭 시 그대로 남아있는 캐시를 초기화하는 등에 쓸 수 있겠습니다.


html로 브라우저 캐시를 초기화하기 : 캐시를 사용하지 않도록 하는 메타태그 no-cahe

pragma : no-cache는 캐싱을 방지하는 메타태그입니다.Expires: -1는 캐시된 페이지를 즉시 만료합니다.

<meta http-equiv="Expires" content="Mon, 06 Jan 1990 00:00:01 GMT">
# 위의 명시된 날짜 이후가 되면 페이지가 캐싱되지 않습니다.
(따라서 위와 같은 날짜로 지정할 경우 페이지는 지속적으로 캐싱되지 않습니다.)
<meta http-equiv="Expires" content="-1">
# 캐시된 페이지가 만료되어 삭제되는 시간을 정의합니다. 특별한 경우가 아니면 -1로 설정합니다.
<meta http-equiv="Pragma" content="no-cache">
# 페이지 로드시마다 페이지를 캐싱하지 않습니다. (HTTP 1.0)
<meta http-equiv="Cache-Control" content="no-cache">
# 페이지 로드시마다 페이지를 캐싱하지 않습니다. (HTTP 1.1)


출처: https://coding-restaurant.tistory.com/339 [코딩맛집]


void SetMultiSelectMode(GridView view, DevExpress.XtraGrid.Views.Grid.GridMultiSelectMode multiSelectMode = DevExpress.XtraGrid.Views.Grid.GridMultiSelectMode.CheckBoxRowSelect) {
	view.OptionsSelection.MultiSelectMode = multiSelectMode;
}

string GetSelectedRows(GridView view) {
	//출처 : DevExpress - "Demo Center 19.2" / WinForms Demos / Data Grid and Editors / UI CUSTOMIZATION / Cell Selection 
    string ret = "";
    int rowIndex = -1;
    if(view.OptionsSelection.MultiSelectMode != GridMultiSelectMode.CellSelect) {
        foreach(int i in gridView1.GetSelectedRows()) {
            DataRow row = gridView1.GetDataRow(i);
            if(ret != "") ret += "\r\n";
            ret += string.Format("{2}: {0} (#{1})", row["CompanyName"], i, Properties.Resources.CompanyName);
        }
    }
    else {
        foreach(GridCell cell in view.GetSelectedCells()) {
            if(rowIndex != cell.RowHandle) {
                if(ret != "") ret += "\r\n";
                ret += string.Format("{1}: #{0}", cell.RowHandle, Properties.Resources.Row);
            }
            ret += "\r\n    " + view.GetRowCellDisplayText(cell.RowHandle, cell.Column);
            rowIndex = cell.RowHandle;
        }
    }
    return ret;
}


+ Recent posts